No products in the cart.
Application Guide
Restaurant QSC Automation with Edge AI Camera:
Deploying a MQTT-Based Monitoring System (NE301 + YOLOv8)
QSC cleanliness audits still rely on fixed weekly schedules — even when traps are clean. This guide shows system integrators and embedded developers how to deploy a hardware-based edge AI vision system that switches insect trap management from scheduled to demand-driven, using the NeoEyes NE301 on-device AI camera, a custom YOLOv8 model, and MQTT integration. No cloud subscription required.
The Hidden Cost of "Scheduled Cleaning" in QSC
In the world of global fast-food chains, QSC — Quality, Service, Cleanliness — is the operational standard that determines brand trust, franchise compliance scores, and in serious cases, operating licenses. Of the three pillars, Cleanliness is the one most vulnerable to silent failure: problems accumulate invisibly between audit windows.
Insect trap management sits squarely in this blind spot. Every restaurant in a network maintains sticky-paper trap boxes — typically checked and replaced on a fixed weekly or bi-weekly schedule. The logic is simple: show up on Tuesday, swap the paper, log the visit, move on. The problem is that the schedule is decoupled from reality. A high-traffic summer week might saturate a trap in three days. A slow February week might leave a perfectly good trap being replaced unnecessarily.
The scheduling paradox
Fixed schedules create two failure modes simultaneously: over-servicing (replacing traps that are still effective, wasting consumables and labor) and under-servicing (missing a trap that reached saturation before the next scheduled visit). Neither is acceptable in a high-standards QSC environment — and neither is visible without real-time monitoring.
For a system integrator or developer building a monitoring solution for a chain restaurant client, the ask is straightforward: automate the decision of when to replace, not just log that replacement happened. This is the shift from scheduled maintenance to demand-driven maintenance — and it's the core problem this deployment guide addresses.
29.4%
CAGR of AI in QSR market, 2024–2034 (market.us)
<50ms
NE301 on-device inference latency (Neural-ART NPU)
7–8µA
NE301 deep-sleep current — months of battery life
2 classes
Model output: Effective / Critical-Replacement
Why Edge AI — Not Cloud AI — for This Use Case
Before selecting hardware, the architectural decision that most affects system design is where inference runs. Cloud-based AI vision workflows route images to a remote API for processing and return a result. Edge AI runs the model directly on the camera device, with no round-trip. For restaurant back-of-house deployments, this distinction has real operational consequences.
| Factor | Edge AI (NE301) | Cloud AI Camera | Manual Inspection |
|---|---|---|---|
| Inference latency | <50ms on-device | 200ms–2s API round-trip | Hours / scheduled |
| Network dependency | None — runs offline | Requires stable upload | None |
| Back-of-house WiFi dead zones | Continues operating, caches alerts | Inference stops | N/A |
| Data privacy (GDPR / CCPA) | Only structured data leaves device | Video streams leave premises | No data generated |
| Recurring cost | Hardware only, no subscription | Per-camera SaaS fee | Labor cost per visit |
| Power requirement | Battery / PoE / USB — 7–8µA sleep | Continuous mains power | None |
The restaurant kitchen environment adds further constraints that favor on-device processing. Back-of-house areas frequently sit at the edge of WiFi coverage. Condensation from cooking and refrigeration affects connectivity. And in multi-franchise scenarios, sending raw video offsite creates a compliance surface that legal and IT teams at the franchise operator level are increasingly reluctant to accept.
Developer note: on-device inference vs cloud APIs
The NE301's Neural-ART NPU delivers <50ms inference for a quantized YOLOv8 Nano model. Cloud vision APIs (Google Vision, AWS Rekognition) introduce 200ms–2s latency plus per-call costs. For a camera checking a trap every 5 minutes across 50 locations, on-device inference eliminates thousands of API calls per day — and keeps all image data local.
System Architecture: End-to-End Data Flow
The full deployment stack for this use case involves five components, each with a clear responsibility. Understanding the data flow at this level helps integrators plan network topology, server requirements, and alert logic before hardware arrives on site.
NE301 Camera
Captures image of trap
›
YOLOv8 NPU
On-device inference <50ms
›
MQTT Uplink
JSON result + metadata
›
MQTT Broker
Routes device messages
›
Home Assistant
Dashboard + alerts
The camera captures an image of the insect trap box on a configured schedule (every N minutes, or event-triggered). The on-device YOLOv8 model classifies the trap as either Effective or Critical-Replacement. The result — a JSON payload including class name, confidence score, battery level, and timestamp — is pushed via MQTT to a broker. Home Assistant (or any MQTT-compatible platform) consumes this topic and drives dashboard displays, history logging, and automated alerts to cleaning staff.
No image data leaves the device in steady-state operation. Only the structured inference result is transmitted. This architecture can be extended: multiple NE301 units across locations all push to the same broker, with device MAC addresses used as unique identifiers in the topic path (device/<mac>/uplink).
Step-by-Step: Training and Deploying a Custom Detection Model
This section walks through the full model lifecycle — from image collection through production deployment. The CamThink AI Tool Stack handles data management, training, and quantization in a single pipeline.
Step 1
Image Collection
Mount the NE301 in position above the insect trap box. Use the AI Tool Stack's device-binding feature to capture images directly to a project dataset. Aim for 50–100 images per class across varied lighting conditions (morning light, evening overhead, flash). If you already have archived images, upload them directly via the platform's dataset import.
Step 2
Annotation: Define Two Classes
Create two classification labels in the project: Effective (trap paper is clean or lightly used) and Critical-Replacement (trap paper is saturated or visibly compromised). Use bounding-box annotation to mark the sticky paper region within each image. Consistent annotation boundaries improve model precision on small targets.
Step 3
Model Training
Click Train Model → New Training in the AI Tool Stack. Keep the default YOLOv8 Nano architecture — it is optimized for the NE301's STM32N6 + Neural-ART NPU hardware target. Training typically completes in 10–20 minutes depending on dataset size. Review the precision/recall metrics before proceeding to quantization.
Step 4
Quantization (INT8 → .bin package)
Click Quantize and select NE301 Model Package as the output format. If the trap paper occupies a small portion of the frame, set Input Size to 320 for improved detection of small targets. The quantizer converts the float32 model to an INT8 binary optimized for the Neural-ART NPU. Download the resulting *.bin file.
Step 5
Deploy and Verify
Upload the *.bin package via the NE301 Web UI's Upload button. After flashing, run a live-view test by pointing the camera at both a fresh and a saturated trap. Confirm that class labels render correctly in the live detection overlay. Upload 5–10 additional test images through the AI Tool Stack to validate model accuracy before going live.
Self-hosted AI Tool Stack required
The CamThink AI Tool Stack must be installed on your own server — it is not a hosted SaaS service. The open-source repo on GitHub includes full setup documentation. Plan this as a one-time infrastructure step before starting client deployments.
MQTT Integration: Connecting NE301 to Home Assistant
Once the model is deployed and the camera is publishing results, the MQTT integration is what makes the data operationally useful. Home Assistant is used here for its open-source status, broad hardware support, and flexible automation engine — but any MQTT-compatible platform (Node-RED, custom backend) works identically with the same topic structure.
1. Configure MQTT Forwarding on NE301
In the NE301 Web UI, navigate to Application Management and set your MQTT broker address, port (default 1883), uplink topic, and credentials. The device MAC address makes each device's topic path unique by default: device/<last-6-mac>/uplink.
2. NE301 MQTT Payload Structure
Every detection event publishes a JSON payload. Understanding the schema is necessary for building sensors and automation rules in any downstream platform:
JSON NE301 uplink payload — detection event
// Abbreviated payload — key fields for integration
{
  "metadata": {
    "image_id":   "cam01_1767603614",
    "timestamp":  1770084900,         // Unix epoch
    "width":      1280,
    "height":     720
  },
  "device_info": {
    "device_name":     "NE301-2A38A5",
    "battery_percent": 100,
    "communication_type": "wifi"      // or "lte"
  },
  "ai_result": {
    "model_name":      "YOLOv8 Nano Object Detection",
    "inference_time_ms": 50,
    "ai_result": {
      "detections": [
        {
          "class_name":  "Effective",       // or "Critical-Replacement"
          "confidence":  0.87,
          "x": 0.004, "y": 0.053,
          "width": 0.999, "height": 0.804
        }
      ],
      "detection_count": 1
    }
  }
}
3. Home Assistant Configuration
Add the following sensor definitions to /homeassistant/configuration.yaml. Replace 76b2fc32 with your device's MAC-derived topic segment, and update class names if you used different labels during training.
YAML configuration.yaml — NE301 MQTT sensor definitions
mqtt:
  sensor:
    # 1. Trap status — driven by model class_name output
    - name: "Trap Monitoring Status"
      unique_id: "ne301_trap_status"
      state_topic: "device/76b2fc32/uplink"
      value_template: >-
        {% if value_json.ai_result.ai_result.detections | length > 0 %}
          {{ value_json.ai_result.ai_result.detections[0].class_name }}
        {% else %}
          None
        {% endif %}
      icon: "mdi:bug-check"

    # 2. Battery level
    - name: "NE301 Battery"
      unique_id: "ne301_battery"
      state_topic: "device/76b2fc32/uplink"
      value_template: "{{ value_json.device_info.battery_percent }}"
      device_class: battery
      unit_of_measurement: "%"

    # 3. Last detection timestamp
    - name: "Last Detection Event"
      unique_id: "ne301_last_event"
      state_topic: "device/76b2fc32/uplink"
      value_template: "{{ (value_json.metadata.timestamp | int) | timestamp_local }}"
      device_class: timestamp
After saving, apply changes in Home Assistant's Developer Tools → MQTT → Manually configured MQTT entities. The sensors will appear immediately in the Devices list. From here, standard Home Assistant automations can trigger notifications to cleaning staff when the Trap Monitoring Status sensor reads Critical-Replacement.
Platform flexibility
The NE301 MQTT output is platform-agnostic. If your client's infrastructure uses Node-RED, a custom Python consumer, or a proprietary FM system, the same topic schema applies. Home Assistant is used here as a reference integration — the MQTT data interaction guide documents the full payload spec for custom implementations.
Hardware Selection for This Deployment
For insect trap monitoring in chain restaurant environments, hardware selection depends primarily on whether the deployment is a single-location PoC or a multi-site rollout, and whether mains power is accessible at the mounting point.
Recommended for This Use Case
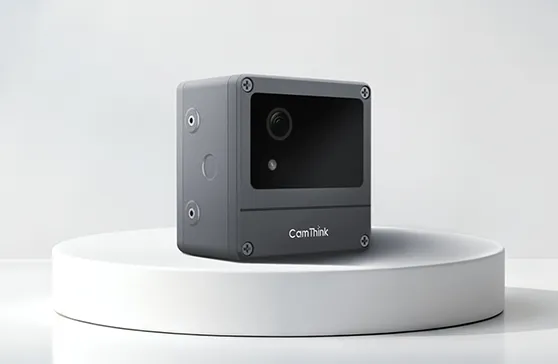
NeoEyes NE301
Primary Node · On-Device AI
- STM32N6, Cortex-M55 + Neural-ART NPU
- 0.6 TOPS on-device inference
- 4MP MIPI CSI sensor (51°/88°/137° FOV)
- Wi-Fi · LTE Cat-1 · PoE variants
- Deep sleep: 7–8µA · IP67 weatherproof
- YOLOv8 native · Open firmware · Web UI
$199.90 – $258.00
Best for this use case: Single-location PoC, battery-powered mounting inside kitchen areas, LTE variant for locations with weak WiFi, PoE variant for always-on fixed installations.
View Details →For Multi-Site Scale-Out
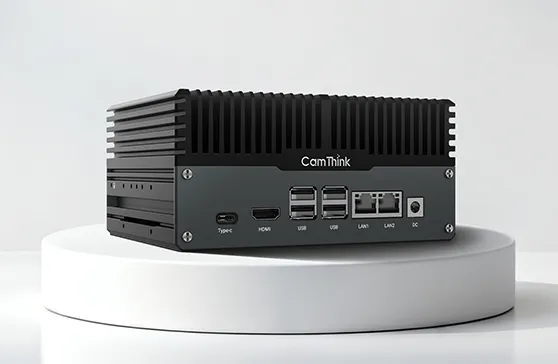
NeoEdge NG4500
Edge Server · Multi-Camera Hub
- NVIDIA Jetson Orin NX/Nano
- Up to 157 TOPS compute
- JetPack 6.0+ · supports VLM/LLM
- Multi-camera aggregation
- CAN · RS232 · RS485 · multi I/O
- Fanless · 12–36V DC
$899.00 – $1599.00
Best for: Enterprise chain rollouts where a single hub aggregates feeds from 10+ NE301 cameras across a large kitchen or multiple locations managed from one on-site server.
View Details →For most initial deployments — a single restaurant location or a pilot across 3–5 sites — the NE301 operating standalone is the right architecture. The NG4500 becomes relevant when the client requires centralized inference management, model versioning across a camera fleet, or integration with heavier VLM-based analytics on the same edge node.
Deployment Roadmap: From PoC to Production
A realistic PoC for this use case runs 4–6 weeks from hardware receipt to a validated, alert-generating system. The timeline below assumes one system integrator or developer with access to the restaurant site for initial setup.
Week 1
Hardware Setup and Network Configuration
Unbox and activate the NE301. Configure WiFi or LTE connectivity via the Web UI. Set up the MQTT broker (Mosquitto on a local server or cloud VM). Confirm the camera is publishing heartbeat messages to the broker. Mount the camera in position above the insect trap box.
Week 2
Image Collection and Dataset Preparation
Capture 80–150 images across the two states (Effective / Critical-Replacement). Vary lighting and trap fullness levels. Use the AI Tool Stack to annotate images. Aim for a balanced dataset — roughly equal representation of each class — before proceeding to training.
Week 3
Model Training, Quantization, and Deployment
Run the full training pipeline in the AI Tool Stack. Quantize to the NE301 target format. Upload and verify with test images. Adjust confidence thresholds if needed — the default 0.24 threshold works well for this two-class problem but can be tuned per deployment environment.
Week 4
Platform Integration and Alert Rules
Connect to your client's IoT platform: The NE301 publishes platform-agnostic MQTT payloads compatible with AWS IoT Core, Azure IoT Hub, ThingsBoard, or custom backends. For rapid prototyping and PoC validation, Home Assistant provides a no-code path to dashboards and alerts (see reference implementation below). Configure MQTT sensors, build dashboards for trap status/battery/timestamp, and set automation: when status = Critical-Replacement, trigger notifications (Telegram, email, Slack, or webhook to facility management).
Week 5–6
Live Validation and Scale Planning
Run the system live for 2 weeks. Log all alert events and compare against actual trap condition on inspection. Use this data to validate confidence thresholds and build the ROI case for the client — actual labor savings vs. scheduled inspection frequency. This data becomes the justification for expanding to additional locations.
FAQ
What's the practical difference between on-device edge AI and a cloud AI camera for this use case?
A cloud AI camera captures the image, sends it to a remote API for processing, and waits for a response. For a trap-check use case, this introduces 200ms–2s latency per inference, a dependency on stable internet connectivity, and a recurring per-call or subscription cost. It also means video frames leave the premises, which creates data privacy surface.
The NE301 runs the inference model directly on the STM32N6 Neural-ART NPU — the entire process happens inside the camera in under 50ms, no internet required. Only the structured result (class name, confidence, timestamp) is transmitted via MQTT. This is a fundamental architectural difference, not a performance optimization.
How long does it take to train a working model for insect trap detection?
With 80–150 annotated images and default settings in the AI Tool Stack, training a YOLOv8 Nano model typically takes 10–20 minutes on a mid-range GPU server. Quantization adds another 5–10 minutes. The total pipeline from annotated dataset to deployable .bin file is under an hour in most cases.
The bottleneck is usually dataset preparation — specifically ensuring you have enough images of the Critical-Replacement state, which requires waiting for traps to actually reach saturation or sourcing archived images from the client.
Can the NE301 operate in back-of-house areas with weak or intermittent WiFi?
Yes. Because inference runs on-device, the NE301 continues classifying trap states even when WiFi is unavailable. The MQTT uplink will queue and retry when connectivity is restored. For locations with persistent WiFi dead zones near kitchen areas, the LTE Cat-1 variant is the appropriate choice — it operates over a cellular data connection independently of the restaurant's WiFi network.
Does on-device processing help with GDPR or CCPA compliance?
It significantly reduces the compliance surface. When the NE301 processes images locally and transmits only structured inference results (class label, bounding box coordinates, confidence score), no video or image data leaves the premises in normal operation. The camera is pointed at an insect trap box rather than at people, which further reduces the likelihood of capturing personal data.
That said, CamThink does not provide legal compliance certification. Operators should confirm their specific deployment configuration with their legal team, particularly if the camera field of view could incidentally capture staff.
How many NE301 cameras are needed per restaurant location?
One camera per trap box, positioned to fill the frame with the sticky paper area. A typical fast-food kitchen has 2–4 trap boxes (kitchen, storage room, restrooms). Each NE301 operates independently and publishes to its own MQTT topic, so adding cameras to a location is simply a matter of hardware deployment — no changes to the broker or Home Assistant configuration schema are required beyond adding the new device's topic.
Can this integrate with platforms other than Home Assistant?
Yes. The NE301 publishes standard MQTT messages — any system that can subscribe to an MQTT topic can consume the data. Node-RED, custom Python scripts (using paho-mqtt), AWS IoT Core, Azure IoT Hub, and custom facility management backends all work with the same topic and payload schema. Home Assistant is used in this guide because it provides a no-code path to dashboards and notifications, but it is not required.
What's the minimum technical background needed to deploy this system?
Comfortable working with Linux servers and basic networking (IP addressing, MQTT broker setup) is sufficient for most of the stack. The AI Tool Stack web interface handles training and quantization without requiring ML expertise. Home Assistant has a GUI-based configuration path for most integrations, though the configuration.yaml sensor definitions in this guide require basic YAML editing. Python familiarity is helpful if you're building a custom backend rather than using Home Assistant.
Developer Resources
Everything you need to build and deploy
Related Reading
More Edge AI Deployment Guides
Explore real-world edge AI implementations across retail, QSR, and facility management. Each guide provides end-to-end deployment steps: architecture, hardware selection, model training, and platform integration.
→
Refrigerator & Shelf Monitoring — Retail Edge AI Guide
Cold chain compliance, out-of-stock detection, planogram monitoring with NE301
→
How to Deploy NE301 Edge AI Cameras Without Power or Internet
Battery life calculations, IP67 protection, LTE Cat-1, solar power, and outdoor deployment strategies
→
5 Things the NeoEyes NE301 Can Help You Do Today
Offline computer vision, long-term outdoor monitoring, modular edge AI deployment, and YOLOv8 on-device
→
Edge AI vs. Cloud-Based Vision System — Architecture, TCO, and Deployment Fit
Latency, connectivity, data privacy, model flexibility, power, and integration architecture comparison